

This article will be featured on Madame Deals!
When I was just getting into blogging, I had no idea how to start one or what all of the terminology meant. I knew I wanted a blog site that "looked" like a website but I could not afford to have a professional design my site. After searching many sites and looking at all sorts of templates, I found the key to turning your blog into a "mock" website. First, here are some basic "blog" terminology.
Background - That is the color or pattern that you see behind your blog frame. It acts kind of like wallpaper for your blog site.
Templates - This is a pre-design layout. It already has your post and title laid out for you.
Header - That is what you see at the very top of a blog page. It has your Blog Title inside of your header.
Monetize Your Blog - That means to set you blog up to make an income. You can make an income off of your blog by becoming affiliate partners with different companies or placing online ads on your blog space.
Post - That is where you write your article.
Pages - This is your toolbar. You click Pages to create different pages on your blog.
HTML Code - This is the gibberish you see on sites - it is in a computer code language. With these codes you tell your blog site what you want on it.
Gadgets (Widgets) - These are the little add-ins that you can add on to your blog site. Like a Facebook widget would have your Facebook page and by clicking on it - it takes your reader to your Facebook page. Another popular widget is Add This - it has a way to add follow buttons and Share Buttons so that your reader can follow you and share your post on social network.

Now Here is how to set up a Blog Site:
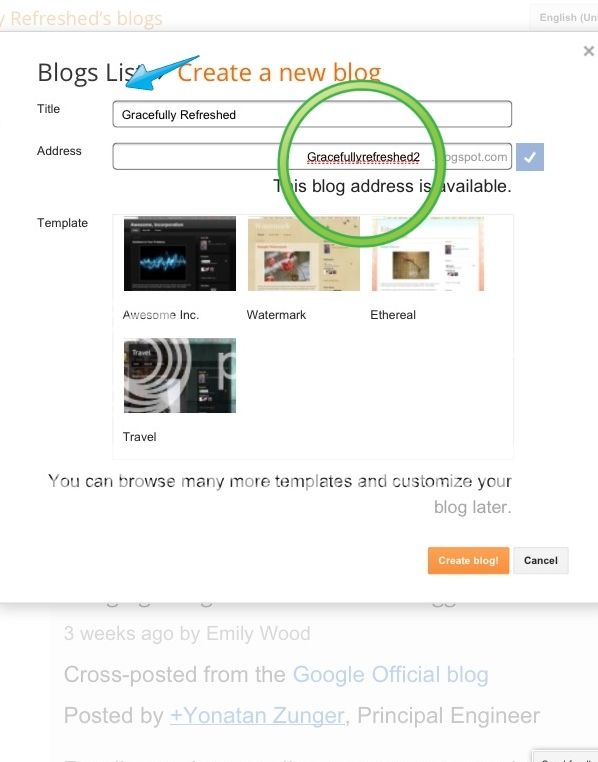
Step 1 - Create your blog site. Find out what blog site you would like to go with. I chose Blogger. There are tons out there and the two top sites are Word Press and Blogger. We will be using Blogger. Create a catchy Blog site name and title. Your name will go in the domain site link and your title is what appears on the top of your blog page. Your site name and title can be the same (like mine) or you can choose to have it different. When you go to Blogger - you will click create new blog and it will ask you, "Title" that is what appears at the top of your page. Then "address" that is what will appear in your domain link like: http://
Step 2 - Changing your Blog Template. Your Blog has a code already pre-designed to give it an ordinary look. If you would like for your blog to showcase your style and your taste then go to a free blog template site. My personal favorite is The Cutest Blog on the Block. They have free backgrounds and Templates.

Step 3 - If you choose a Background on The Cutest Blog on the Block then copy the code the site gives you. Then go to "Layout" on your blog site. Click "Gadgets" and add the "HTML" gadget. Once you add that paste your code into the box and click save. If you choose to only change the Background. Then be sure to click "Template" and go to "Customize" and choose "Backgrounds" and change your background to "Transparent". Then Skip to Step 6.

Step 4 - If you want to change your template. Go to The Cutest Blog on the Block and choose "Template" copy the code it gives you then go to your blog main setup page and click "Template". Click "Edit HTML" and then remove the code already there and paste the new code. A box will appear and ask you a question about your widgets. You want to click "Keep Widgets."
Step 5 -Go to your "Template" page and click "Customize". From there choose "Advanced" and change all of your background colors to "Transparent". Remember to click "Apply to Blog" when finished to save all of your changes

Step 6 - Once you have created your blog look - now you must set up your Header. If you choose to change your "Template" then it will come with an already designed header ready for use. You just have to type in your Title. If you choose to change the Background only then you will have to customize your own header. Go to the Cutest Blog on the Block. Pick out the header you like - save it as a picture and then go to a picture program (Like Picasso, Photobucket, or Photoshop) and add a Text to your image. Save it and then go back to your blog setup page and click "Layout" and upload the image into your "Header" line.
Step 7 - Once you have created all of that you then can change your font style and color of your font and links on the "Template" page. Click "Customize" and go to "Advanced" and change your fonts there.
Once you have finished then click "Apply Changes to Blog."
Step 8 - If you would like to add Gadgets to your blog then go to "Layout" and click "Gadgets" Depending on your blog layout, you can place gadgets on the right side, left side, or underneath your post. These gadgets can be easily moved around by double clicking the gadget and moving it with your mouse.

Step 9 - Now....if you would like a top toolbar with different landing pages then go to your "Gadgets" and add "Pages" then go to "Pages" on your Main Setup Page and add your Page Titles you want and in the order you want it to appear. (For example: Home, About Me, Favorite Blogs, etc.) Once you created your toolbar click where you want it to appear - top or the side. Click "Save Arrangements"
Voila! You now have created a nice looking blog site. Here are the pictures of my before and after. Be sure to visit www.gracefullyrefreshed.com for more posts.
Before:

After:
When I was just getting into blogging, I had no idea how to start one or what all of the terminology meant. I knew I wanted a blog site that "looked" like a website but I could not afford to have a professional design my site. After searching many sites and looking at all sorts of templates, I found the key to turning your blog into a "mock" website. First, here are some basic "blog" terminology.
Background - That is the color or pattern that you see behind your blog frame. It acts kind of like wallpaper for your blog site.
Templates - This is a pre-design layout. It already has your post and title laid out for you.
Header - That is what you see at the very top of a blog page. It has your Blog Title inside of your header.
Monetize Your Blog - That means to set you blog up to make an income. You can make an income off of your blog by becoming affiliate partners with different companies or placing online ads on your blog space.
Post - That is where you write your article.
Pages - This is your toolbar. You click Pages to create different pages on your blog.
HTML Code - This is the gibberish you see on sites - it is in a computer code language. With these codes you tell your blog site what you want on it.
Gadgets (Widgets) - These are the little add-ins that you can add on to your blog site. Like a Facebook widget would have your Facebook page and by clicking on it - it takes your reader to your Facebook page. Another popular widget is Add This - it has a way to add follow buttons and Share Buttons so that your reader can follow you and share your post on social network.
Now Here is how to set up a Blog Site:
Step 1 - Create your blog site. Find out what blog site you would like to go with. I chose Blogger. There are tons out there and the two top sites are Word Press and Blogger. We will be using Blogger. Create a catchy Blog site name and title. Your name will go in the domain site link and your title is what appears on the top of your blog page. Your site name and title can be the same (like mine) or you can choose to have it different. When you go to Blogger - you will click create new blog and it will ask you, "Title" that is what appears at the top of your page. Then "address" that is what will appear in your domain link like: http://
Step 2 - Changing your Blog Template. Your Blog has a code already pre-designed to give it an ordinary look. If you would like for your blog to showcase your style and your taste then go to a free blog template site. My personal favorite is The Cutest Blog on the Block. They have free backgrounds and Templates.
Step 3 - If you choose a Background on The Cutest Blog on the Block then copy the code the site gives you. Then go to "Layout" on your blog site. Click "Gadgets" and add the "HTML" gadget. Once you add that paste your code into the box and click save. If you choose to only change the Background. Then be sure to click "Template" and go to "Customize" and choose "Backgrounds" and change your background to "Transparent". Then Skip to Step 6.
Step 4 - If you want to change your template. Go to The Cutest Blog on the Block and choose "Template" copy the code it gives you then go to your blog main setup page and click "Template". Click "Edit HTML" and then remove the code already there and paste the new code. A box will appear and ask you a question about your widgets. You want to click "Keep Widgets."
Step 5 -Go to your "Template" page and click "Customize". From there choose "Advanced" and change all of your background colors to "Transparent". Remember to click "Apply to Blog" when finished to save all of your changes
Step 6 - Once you have created your blog look - now you must set up your Header. If you choose to change your "Template" then it will come with an already designed header ready for use. You just have to type in your Title. If you choose to change the Background only then you will have to customize your own header. Go to the Cutest Blog on the Block. Pick out the header you like - save it as a picture and then go to a picture program (Like Picasso, Photobucket, or Photoshop) and add a Text to your image. Save it and then go back to your blog setup page and click "Layout" and upload the image into your "Header" line.
Step 7 - Once you have created all of that you then can change your font style and color of your font and links on the "Template" page. Click "Customize" and go to "Advanced" and change your fonts there.
Once you have finished then click "Apply Changes to Blog."
Step 8 - If you would like to add Gadgets to your blog then go to "Layout" and click "Gadgets" Depending on your blog layout, you can place gadgets on the right side, left side, or underneath your post. These gadgets can be easily moved around by double clicking the gadget and moving it with your mouse.
Step 9 - Now....if you would like a top toolbar with different landing pages then go to your "Gadgets" and add "Pages" then go to "Pages" on your Main Setup Page and add your Page Titles you want and in the order you want it to appear. (For example: Home, About Me, Favorite Blogs, etc.) Once you created your toolbar click where you want it to appear - top or the side. Click "Save Arrangements"
Voila! You now have created a nice looking blog site. Here are the pictures of my before and after. Be sure to visit www.gracefullyrefreshed.com for more posts.
Before:
After:

